
Thoughts of pristine beauty and abundant wild Pacific salmon make southeast Alaska an attractive and ideal destination for many fishermen. However, it can also be a little intimidating for some, especially if you’ve never fished the Inside Passage. Many believe that their lack of experience will prohibit them from enjoying their trip to its fullest. A little homework and preparation beforehand can contribute to a successful excursion – and fill your freezer with the freshest salmon available.
The big difference between dodgers and flashers is the way they run through the water when being trolled. A dodger has a side-to-side swaying action, while a flasher develops a full 360 degrees rotation. This provides you with two different types of attractors, each giving off a specific flash and vibration pattern.
The correct fish-attracting speed and action is achieved when the attractor has a side-to-side swaying motion. With your boat moving “dead slow,” place a rigged dodger and lure setup in the water and slowly increase your speed until the dodger has developed the proper side to side action. This is your optimum trolling speed.
Note: Dodgers are more speed-sensitive than flashers. If a dodger starts spinning, you are going too fast and you have lost the proper vibration action.
Dodger sizes 1 and 0 are the most commonly used sizes. Using bait for kings, a 38-50 inch leader works well. It is suggested that a dodger leader length shouldn’t be any closer than 2 ½ times the length of the dodger.
Note: Bait is better used with a dodger than a hoochie because it already has its own rotation pattern. Hoochies are dead in the water when pulled. A flasher has a larger motion than a dodger and will give off more action.
The optimum rotation speed is obtained when the attractor is working in regular, full 360° rotation. With your boat in motion, place a rigged flasher and lure setup in the water and increase your speed until the flasher develops these regular full revolutions.
Flashers are normally trolled at 1.7 – 2.5 miles per hour. This speed gives an excellent tail kicking action. It can be trolled as slow as 1.5 and as fast as 3.5 and still work effectively.
Flashers generally work better at slightly faster speeds than dodgers.
Speed is one of the most critical aspects of getting your gear to work.
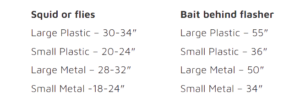
Flies and squid are best used behind flashers or a rotation flasher because hoochies and flies have no action of their own in the water. Flashers will give them a lifelike erratic natural baitfish action.
Leader length can make or break your fishing outing. For all hoochies that are rigged properly, a leader no shorter than 36 inch is the best bang for your buck. A quick way to get the right length is to use your flasher as a measuring stick. The flasher is 11 inches long, so wrap your line lengthwise three times to give you 33 inches. Then add the length of the swivel, and ring and snap on your last wrap for a total of 36 inches. Pretty simple, but effective.
Other flasher suggested leader lengths: for kings are 36-50″ with artificial gear. For herring 42-60.” Coho suggested leader lengths for hoochies: 26-40″ and bait 24-42″
Often adjusting your leader length when not catching fish can make a huge difference. Giving you bait or hoochies more or less action.
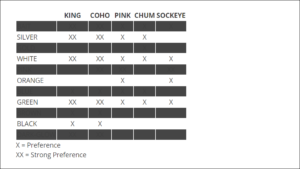
Flasher basic colors commonly used are: Red, Green, Blue and Chartreuse. They come in many colors.
One of the most common mistakes with a flasher is trolling it backwards. The narrow tapered end is the front. The wide rear section of the flasher is the bottom, which attaches to your lure.
Some general rules of thumb to follow while downrigger fishing with a flasher
Distance from downrigger release clip to flasher:
*When fishing with plastic flashers in the top 50 feet of water position flasher 15-40 feet from the release clip
Remember, flashers must rotate to be fished effectively! Either increase your speed, bend your flasher (metal), or shorten your leader length to achieve correct action.
Use 40lb or heavier leader on non-action lures (hootchies, flies) behind flashers and add scent (Smelly Jelly, herring teaser, etc.)
Adult Chinook – Slightly increase leader length when using squid/flies and a plastic flasher
Pinks – Use 22-24″ leader length , hot pink mini squid, and slow troll
There are thousands of different colored squid species in the Pacific Coastal waters, and they all change color depending on water temperature, mating season, and other climatic changes. So the color that works today may not necessarily work next week. Have a good selection of hoochies in your tackle box; change your colors often when unsuccessful. A switch in flasher color can also help, along with a depth change.
At times color is a major factor in enticing a fish to bite, be it to match the fish’s regular feed, such as wounded herring, or simply changing the standard color to stand out amongst a school of the bait. There are hundreds of different color patterns for hoochies and flasher combinations. Every fisherman has his own secret patterns that he guards with his life. Many hours are spent on the dock trying to wrestle another fisherman’s secret color combinations out of him, either by trade or bribe or a quick peek in his boat when he isn’t looking. Many fishermen with this on-looking problem would carefully hide their gear when they come in the harbor and place a dummy set in the stern to confuse the opposition.
In the top thirty feet of water, use any color (especially white). Below fifty feet try blue, green, purple and glow lures.
NOTE: Sockeye are rarely caught on sport gear, as they are plankton eaters
Step 1: Lay the herring on its side on the cutting board. For this demonstration we’re using a blue label size herring with 4/0-5/0 Owner SST hooks on 20 pound Ande monofilament leader.
Step 2: With a very sharp knife make one cut at a 45-degree angle and a 45-degree bevel back towards the belly (pelvic fins) on the herring. Make only one cut, do not saw through the herring. If you saw through the herring, you will leave little jagged edges that will cause the herring to mushroom out in the water.
Step 3: Remove the entrails from the belly of the herring; be careful not to nick the belly with the knife.
Step 4: Take the trailing hook from the leader and run it through the belly on the short side of the herring so it comes out the on the lateral line of the herring.
Step 5: Pull it through. Leave the rear hook trailing.
Step 6: Take the top hook from the leader and run it through the top of the spine and out the top of the herring next to the backbone.
Step 7: You now have a completed cut plug herring ready to mooch or slow troll.
To be a good fisherman it takes more that just dropping your hooks in the water. Lots of people think that the ocean is full of lots of hungry salmon just waiting to bite lures when they are dropped overboard. The truth is that the ocean is full of tasty little feeder fish that the salmon would rather eat. The idea is to present a lure that looks appealing and to place it in a position where a salmon can find it.
For the best fishing look around reefs, rock piles, the shoreline, or on the bottom close to the shoreline where feed balls usually hang out.
Bait fish are often swept along with the current, making them an easy catch for the predators in eddies on the lea side of a point, rock or reef.
It’s important to know which direction the tide flows in the area you are fishing, to determine where the bait fish are being pushed with the tide. The best times to fish the tides are: One hour before, during, and one hour after high and low tide.
Just before the tide reverses (also known as slack tide) the baitfish come off the bottom to feed. This begins the real feeding frenzy among all fish and is the best time to catch one.
Know beforehand when the tidal change occurs so you can be in your hotspot at the right time to catch your fish.
As soon as a salmon strikes, peeling line off your pole, grab the pole and give a good jerk to set the hook. (But not too hard, ripping the hook out of the fish’s mouth.) Once the fish is hooked let it take the line out when it wants.
Keep the tip of your rod raised up as high as possible at all times. Raising your rod tip up high is one of the most important actions you can take in playing a fish. A rod pointed down at the water cannot absorb tension and sometimes the line will break. With your tip up and the fish not running, you can then “pump a fish in.”
Keeping the tip up and reeling on the way down is called pumping the fish in. Always keep a bend in the rod, even when you are reeling down towards the water. If your line starts to go slack, (which will happen if the fish starts to swim towards you) reel as fast as you can to keep tension on the line. Keeping pressure on the fish will help tire it out and keep the hook embedded in its mouth.
Always make sure the tension on your reel is tight enough to set hooks but loose enough to allow you to pull out line with moderate effort. Too much tension can pull the hook out of the fish’s mouth.
After you have played the fish out and it is ready to be netted, your fishing partner should have your net ready. Place one hand high up on the shaft handle and the other hand holding the loose netting against the shaft, just above and behind the net opening. Keep the net out of the way until the fish is close enough to the boat to be netted. Do not chase a fish with the net in the water.
The fisherman playing the fish leads the fish headfirst to the boat, where the net is quickly stabbed into the water. At the same time, let go of the “bag part” of the net while netting the fish headfirst. Then lift the net straight out of the water so the bag will close around the fish.
Note: Most fish are lost at the boat from faulty netting. Also hooks can get caught in the net and ripped out of the fish’s mouth.
After the fish is on board the boat, place the fish on the deck of the boat still in the net. Hit the fish on top of the head with the gaff hook.. Then when the fish is no longer moving, remove the hooks and place the fish in you fish box. Do not attempt to remove the hooks out of the fish when it is still flopping around. It is a pretty good chance you will be getting hooked.
Salmon have a strong tendency to swim at certain depths during the day depending on water temperature, currents, and where the baitfish are. Most fish caught on the same day will be caught at roughly the same depth. Finding the right depth is part of being in the right place at the right time. If you are not catching any fish, constantly change your fishing depth, as well as you tackle. The most common salmon depths are from the surface to 125 feet.
Step 1: BLEED YOUR CATCH
Once you have removed your hooks and before you place your catch on ice, take a knife or a pair of scissors and cut the gills. This will allow the fish to “bleed out”, removing blood from the meat of the salmon and improving the taste and overall quality of the product.
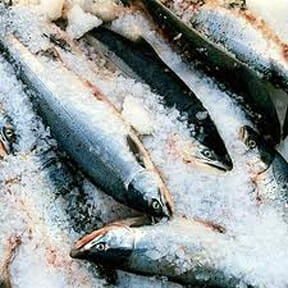
Step 2: ICE YOUR CATCH
Getting your fish immediately on ice prevents deterioration of the meat. When possible, make a “slush” (ice and water mixture) that completely submerges your catch.
Step 3: GUT YOUR FISH
This step generally takes place back at the dock during processing, but if ice is not available or the weather is particularly hot, gutting fish while still out on the water can help ensure a quality product. This is particularly true of Coho Salmon (Silvers). Acid in a Coho’s stomach reacts with heat and will eat through the stomach lining and into the meat.